🌳 The future-proof solution to manage your Flutter versions: global, FVM, or asdf-vm?


Iain Smith / January 26, 2022
14 min read • ––– views


Want to try the latest Flutter version but don't want your existing projects to break? Want to have a consistent environment across the dev team? Want to future-proof your dev environment? Let me show you how...
These are the three distinct evolutions in setting up a dev environment:
- 🌱 Working with one tool version
- 🌿 Working with multiple tool versions
- 🌳 Working with multiple tools with multiple versions
In this article, I will dive into each one and compare their pros and cons, and then, I'll analyse which one would lead to a more future-proofed environment.


I hope you are a Back to the Future fan; there will be more.
Don't install each environment on top of each other, as you will have installed Flutter three times. I recommend only installing one solution.
🌱 Working with one tool version
Most Flutter developers start with the standard install by following the official Flutter.dev getting starting guide. This guide installs the most recent stable version of Flutter in a location of your choice, as well as all dependencies needed to run a project. You can build and run Flutter projects with the same version, which is good enough for most developers. The problems begin when you:
- 👯♀️ Start working in a team and want a consistent environment
- 🙏 Start looking into contributing to open source projects that have different Flutter versions
- 👴 Have existing projects that depend on previous Flutter versions
- 👋 Want to try a newer version of Flutter
These problems have a similar issue; managing the one version of Flutter. You may need to swap to different versions based on a project's setup rather than keeping on one version. Many developers stick with the one global version of Flutter and swap by using the commands below:
# Upgrade your copy of Flutter
flutter upgrade

# Downgrade Flutter to the last active version
# for the current channel.
flutter downgrade

# List or switch Flutter channels.
flutter channel [master, stable, beta]

# When in your flutter install folder
# little bit more hands-on
git checkout [flutter build version]

The storm of versions is here Doc!
Having lots of projects with different versions can be problematic to control. The methods above have a lot of overhead to manage, and it takes time to switch. You will need to keep track of what version you are on and what version the project you are running uses. This method can be very cumbersome and clunky to swap. However, we can solve these problems by managing the versions more efficiently.
🌿 Working with multiple tool versions
Managing the versions more efficiently is the second step in the dev environment evolution. Using a version manager will allow for efficient management of the tool's version. But what is a Version manager?
What is a Version Manager?
Almost all languages and frameworks nowadays have a version manager. If you have used Ruby, you might be familiar with using rvm, rbenv or frum to manage your versions, or if you use Node, it has a similar list; nvm, nodist and n. A Version Manager is usually a CLI tool that will typically control:
- The download and caching of the tool versions
- The mechanism to allow for swapping versions
- A means to track what version a project uses
- Extra features the author of the Version Manager thinks are helpful for the developer
So with a Version Manager, you could easily swap between all the versions you want with ease. Most do this by altering the PATH environment variable to add the location of a specific tool's version. Some also use symlinks or shims to set the version, but we will go over that later. To fully understand their potential, let's look at the setup and usage of a popular Flutter Version Manager - fvm.
FVM - flutter Version Manager
To install FVM, you can follow the getting started guide on the FVM site. I would follow the standalone setup, as recommended in the guide. I am going to run through how you install on macOS, start by installing FVM with these commands:
brew tap leoafarias/fvm
brew install fvm
Some further setup steps are needed to start using FVM in a project. Firstly, add the flutter SDK folder that FVM uses for your project to the .gitignore
FVM will create a relative symlink in your project from
.fvm/flutter_sdkto the cache of the selected version. Add it to your.gitignore
Next, we have to setup our IDE to use the FVM selected version of Flutter. I would recommend automatic version switching rather than manual to keep things simple. For automatic version switching based on the project, we can set the dart.flutterSdkPath . Below are the settings for VSCode to set the flutter SDK path and remove the .fvm folder from VSCode's search and file watcher. (for Android Studio, check the FVM guide):
{
  "dart.flutterSdkPath": ".fvm/flutter_sdk",
  // Remove .fvm files from search
  "search.exclude": {
    "**/.fvm": true
  },
  // Remove from file watching
  "files.watcherExclude": {
    "**/.fvm": true
  }
}
As you can see, this sets the Flutter SDK path to the symlinked version of Flutter we have in the project, located at .fvm/flutter_sdk .
You can set up manual version switching by setting
"dart.flutterSdkPaths": ["/Users/[Your User]/fvm/versions"]
We need to install a version of Flutter first to get this folder. The following commands will install the current stable version of Flutter. If you are doing this for a project, I recommend using a specific version, i.e. 2.8.1, not "stable", as stable will change every couple of months. Commands to install and use a Flutter version using FVM:
# Show all available versions of Flutter
fvm releases

# Downloads and Installs the version specified,
# can use "stable" tag
fvm install 2.8.1

# Once in the project folder,
# sets the version of Flutter for the project
fvm use 2.8.1
Now we will have the .fvm folder and the version of flutter set for this project to 2.8.1 :

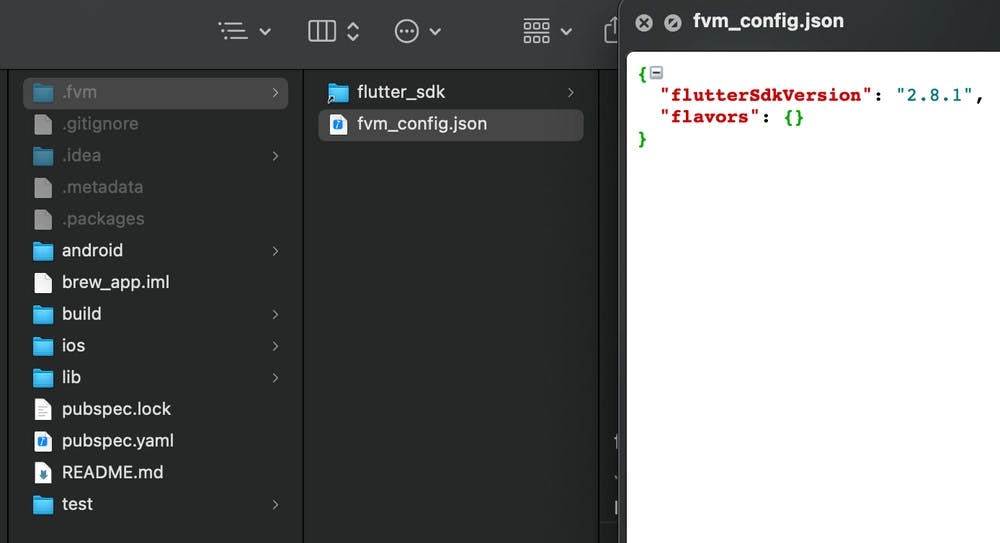
.fvm folder and config file with Flutter 2.8.1 set
If I was to create another project, I could follow the same commands but select a different version of Flutter for that project. This setup allows for multiple versions of Flutter on a per-project basis, perfect!

FVM is amazing!
The developer for FVM has also added some extra commands to suit other needs a Flutter developer might want. I won't go into details as I haven't needed to use them, but here is a list of all the commands FVM offers:
Available commands:
  config     Set configuration for FVM
  dart       Proxies Dart Commands
  doctor     Shows information about environment,
             and project configuration.
  flavor     Switches between different project flavors
  flutter    Proxies Flutter Commands
  global     Sets Flutter SDK Version as a global
  install    Installs Flutter SDK Version
  list       Lists installed Flutter SDK Versions
  releases   View all Flutter SDK releases available
             for install.
  remove     Removes Flutter SDK Version
  spawn      Spawns a command on a Flutter version
  use        Sets Flutter SDK Version
             you would like to use in a project
Now you might be thinking, this is great, I don't need anything else! If you are only going to develop Flutter apps, you might be correct. But as a developer, you know things change, and there might come a time when you need to run Ruby or Node for a project. You could download a version manager for each of those tools and learn how to use them separately, e.g. here are the commands rbenv, a popular Ruby Version Manager offers:
Some useful rbenv commands are:
   commands    List all available rbenv commands
   local       Set or show the local
               application-specific Ruby version
   global      Set or show the global Ruby version
   shell       Set or show the shell-specific
               Ruby version
   install     Install a Ruby version using ruby-build
   uninstall   Uninstall a specific Ruby version
   rehash      Rehash rbenv shims
               (run this after installing executables)
   version     Show the current Ruby version
               and its origin
   versions    List installed Ruby versions
   which       Display the full path to an executable
   whence      List all Ruby versions that
               contain the given executable
If another tool came along that we wanted to use, we could install a Version Manager but we would need to learn another set of commands. Surely there must be a way to standardise all these Version Managers.

Let's look for a solution for standardised version managers!
🌳 Working with multiple tools with multiple versions
We want a standardised version manager that can easily add new tools/languages/frameworks to future-proof our dev environment. Luckily there is such a solution - asdf-vm!
asdf-vm
Asdf is similar to the version managers we have talked about but with one big difference. It can manage multiple tools runtime versions on a per-project basis. Asdf also uses shims to select the version you are using. Shims are lightweight executables that pass your command along to asdf. They are at the start of your PATH, so the command execution will search them first when running a command. Once we have installed Flutter through asdf, I will show how powerful shims can be.
You first install asdf and then install a plugin for your selected tool. For example, I will set up Flutter to show the benefits asdf has over other solutions.

asdf is where the real magic is ✨
Asdf has a good setup guide, and like before; I will show the setup for macOS. Start by installing asdf with this command:
brew install asdf
Also install jq as it is needed for the Flutter asdf plugin
brew install jq
The next steps depend on what shell you use. I use Oh My Zsh, but if you use bash or other, you can check the steps in the official guide. Add the following to your .zshrc file. The order is important:
# Add this near the top of the file
# This is to allow for auto-completion in the terminal
autoload -U +X bashcompinit && bashcompinit

# Add asdf to the plugin list for OhMyZsh
# I also had git here
plugins=(asdf)

# Then add this at the end of the file
unset ASDF_DIR
source $(brew --prefix asdf)/libexec/asdf.sh
Now asdf is installed, we can add the Flutter plugin. This plugin includes both Flutter and Dart. There are plugins for most libraries or frameworks, and if there isn't, you can create a plugin. For Flutter, we need to run:
asdf plugin-add flutter
And now we need to install a version of Flutter with the following:
# List all versions of Flutter that you can install
asdf list all flutter

# Install a version of Flutter
# asdf doesn't have channels
# as this is a Flutter specific choice
# but you can add an optional channel
# to the end of the version like so
asdf install flutter 2.8.1-stable
asdf install flutter 2.8.1

# There is also a 'latest' keyword that
# will install the latest stable version
asdf install flutter latest
With a Flutter version installed, we can install a project-specific version and a global version. For the project-specific version, we need to change to the project directory and run the following:
# to set this project to the latest stable
asdf local flutter latest

# Or setting a specific version
asdf local flutter 2.8.1-stable
After running this command, asdf will create a .tool-versions file to track the version used. You can use this file to track the versions of multiple tools. In our example, it will contain a single line for Flutter:
flutter 2.8.1-stable
We can also set the global version of Flutter on the dev environment using this command:
# This will set the global version
# of Flutter for this machine
asdf global flutter 2.8.1-stable
Now here comes the magic part, when you run the command flutter, your machine will look up its PATH to find the command flutter. First, it will run asdf's shim for flutter, which then checks for a .tool-versions file in the current directory. If it finds one, it will use the version specified in that file. If not, it will use the globally specified one. This technique is ideal as you don't need to do any IDE configuration as asdf uses your machine's PATH to facilitate the swap. So changing your directory will change what Flutter version you are running. Very powerful!

A future-proof dev environment, finally!
Using asdf is the final evolution. This setup solves most of the cases developers will encounter when using or installing different versions of tools. Asdf can accommodate new tools with its plugin structure whilst keeping a consistent command structure. The only advancement I can see happening is the move to rust like frum for performance benefits, but it is minor even then.
If you are using VSCode and see this error:

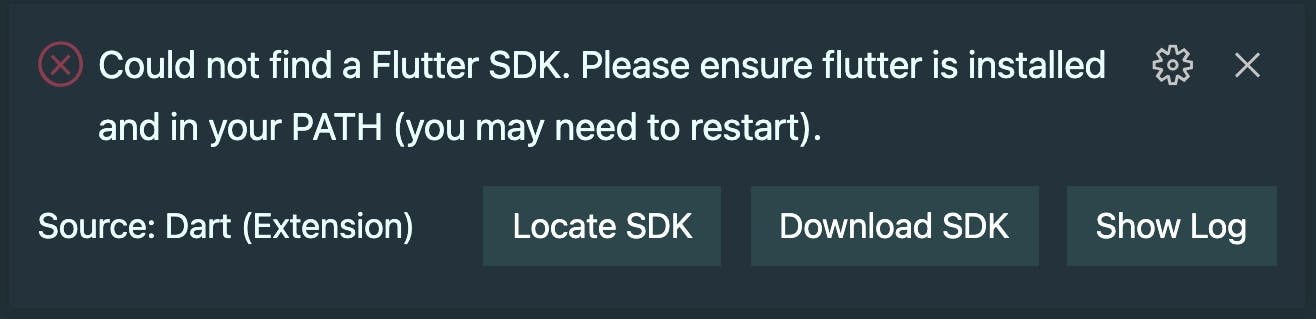
You can set the FLUTTER_ROOT environment variable in your dot file, e.g., .zshrc
like this:
export FLUTTER_ROOT="$(asdf where flutter)
If you have a project that already uses asdf you can run the following to get the supported tool versions:
asdf install
If you see this error about jq:
~/.asdf/plugins/flutter/bin/install: line 25: jq: command not found
~/.asdf/plugins/flutter/bin/install: line 26: jq: command not found
~/.asdf/plugins/flutter/bin/install: line 27: [: -gt: unary operator expected
You will need to install jq
brew install jq
👨🌾 Final thoughts and recommendations
I want to run through some of the pros and cons of each of the setups:
Standard Install
- Only want to try out Flutter
- Only have one project
- Want an easy install
- Change versions
- Track what version multiple projects use
FVM
This setup would be sufficient if you intend only to install Flutter and don't plan to use other tools.
- A slightly more user-friendly installation and operation
- Good Docs for VSCode / Android Studio integration
- Project flavours - I have never used this but maybe for larger projects
- A docker image with FVM
- A GUI version, SideKick
- Support for MacOS, Linux and Windows
- Need to add to the .gitignore file to ignore the .fvm folder to your project
- Not much CI support; need to install FVM manually or use the docker image
- Need to add fvm to the start of commands
- Extra commands that you might not used; spawn, flavour, etc
ASDF
If you will use multiple tools and versions and don't want to remember custom commands, this is the setup for you. It is very flexible for future tools, and the version switching using the directory path is lovely and seamless.
- You can use it for all other tools and libraries - CocoaPods, Ruby, Node, etc
- Only adds a .tool-versions file to the project
- Has its own GitHub action
- Has lots of Docker images for CI/CD
- Version is tracked by directory using .tool-versions or global
- No need to change VSCode / Android Studio settings
- You don't need to learn multiple version managers with custom commands
- Complicated initial setup with OhMyZsh
- For Windows you must install using WSL
I would highly recommend using asdf to manage your tools versions.

Let me know what setup you use? or maybe you have a more future proof setup that you can share?